Help! I have condensation on my glass!
Condensation on window glass can appear as fog, haze, mist, or water droplets. It may come and go depending on season, temperature changes, or time of day. The first step is to identify which surface the condensation is on. This helps determine whether the issue is inside your home, outside the glass, or trapped within the sealed unit. To check, gently touch the condensation on the interior side of the window. Then open the window and carefully check the exterior surface from outside. If access allows, compare both sides to confirm where the moisture is forming.
The condensation is on the exterior side of my window.
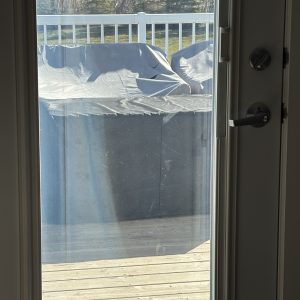
In recent years, Low-E coatings have become significantly more efficient, leading to an increase in reports of condensation forming on the exterior surface of the glass in warmer months. This occurs once moisture content in the air reaches the saturation point (100% relative humidity) and can no longer hold moisture, causing water to condense on cooler surfaces. High-performance sealed units minimize heat transfer through the glass. As a result, the exterior glass remains cooler, making condensation more likely. Though it may be seen as a nuisance, exterior condensation is actually a sign of superior insulation and thermal performance and is not a cause for concern and will resolve as soon as the sun comes out.
The condensation is on the interior side of my window.
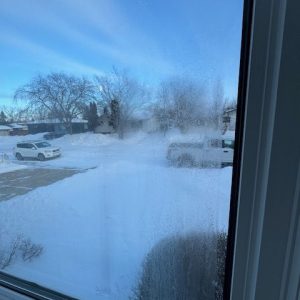
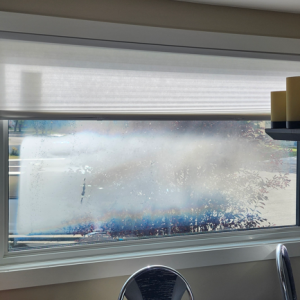
If you have new windows with Low-E coatings, window condensation on the interior of your home is primarily caused by excess humidity, not by a flaw in the windows themselves. Glass surfaces are typically the coldest in a home, so when warm, moist air comes into contact with cooler glass, condensation forms (just like fog on a mirror after a hot shower). In winter months, interior humidity can even show up as ice on the surface of the glass, due to freezing temperatures outside.
Persistent indoor condensation is a sign that humidity levels are too high and could lead to more serious issues like mold, rotting wood, or damaged insulation if left unaddressed.
This is a natural process, but persistent condensation is a sign that indoor humidity levels may be too high. Condensation can be more common during certain times, like the start of heating season, after rapid temperature changes, or during the first year of new construction or remodeling, when building materials are still drying out. Homes in colder climates and newer, energy-efficient houses also tend to experience more condensation due to tighter construction that traps moisture inside. Managing humidity through ventilation and reducing moisture sources can help minimize the problem.
How can I regulate humidity in my home?
Some examples of measures you can take to minimize or eliminate condensation from occurring in your home are as follows:
- Run the fan setting on your furnace to keep air circulating.
- In newer homes, run the air-to-air exchanger to keep air circulating.
- If neither is available, open windows for a few minutes a couple of times a week to balance humidity levels.
- Use a humidity reader or a smart thermostat that tracks indoor/outdoor humidity so you know when levels are getting too high.
- Use kitchen and bathroom exhaust fans, or open a window while cooking or after showers.
- Keep blinds and curtains open so warm air can reach the window glass.
- During colder months, remove insect screens to improve airflow across the glass.
- Make sure your clothes dryer is vented outside.
- Turn off furnace humidifiers if condensation starts forming on windows.
- Monitor areas with naturally high moisture, such as clusters of houseplants, fish tanks, or humidifiers, and adjust as needed.
- Make sure gutters and downspouts drain water away from the house.
- Avoid drying firewood inside the home.
- Waterproof damp basement walls or floors to reduce moisture migrating upward.
- Use proper vapor barriers and ensure good drainage during construction or renovations to prevent external moisture issues.
- In summer, ensure cold air from registers isn’t blowing directly onto windows.
My old windows didn’t condensate, so why do my new windows?
New windows often show condensation because they are more airtight than old, drafty ones, which allowed excess indoor humidity to escape. Now that moisture has nowhere to go, it condenses on the cooler glass surfaces. This is a sign that your home may have too much humidity. Ideally, indoor humidity should stay between 15% and 40%, depending on your home’s construction and the outdoor temperature. The table on the right shows suggested levels of relative humidity for inside the home for varying outside temperatures.
| Outside Air Temperature | Relative Humiditywith inside Temperature of 20°C (68°F) |
|---|---|
| -30°C or below | Not over 15% |
| -30°C or -24°C | Not over 20% |
| -24°C or -18°C | Not over 25% |
| -18°C or -12°C | Not over 30% |
| -12°C or -6°C | Not over 35% |
| -6°C to 0 | Not over 40% |
I can’t touch the condensation at all! I think it’s between the glass.
If you have checked both the interior and exterior surfaces of the glass and neither shows moisture, yet you still see fogging, haze, or water-like staining within the window, this is typically a strong indication of a seal failure.
Modern window glass consists of two or more panes of glass separated by a spacer bar around the edges, creating a sealed airspace between the panes. The perimeter is bonded and sealed using multiple layers of specialized materials. Our sealed units are filled with argon gas in the cavities between panes to improve thermal insulation by reducing heat transfer compared to regular air.
When the seal fails (whether from age, thermal expansion and contraction, building movement, manufacturing defects, or damage from external factors such as applied films or excessive heat) the integrity of this system is compromised. Even a microscopic breach can allow the argon gas to slowly escape while allowing outside air and moisture to enter the cavity.
Once moisture enters the sealed space, it can no longer be easily removed. As temperatures change, that trapped moisture condenses on the interior surfaces of the glass panes, creating the fogging, haze, or droplet-like patterns you may see.
Seal failures are not only an aesthetic issue. They also reduce the insulating performance of the window, meaning higher heat loss in winter, increased heat gain in summer, and reduced overall energy efficiency. See the images below for examples of how seal failure can appear in different stages and patterns on windows.

Can’t you just pump the argon back in?
No. Argon gas is not something that can simply be “topped up” in a finished window.
Sealed units are filled with argon during manufacturing in a controlled environment. The process is done before the unit is fully sealed, using specialized equipment that displaces air with argon while maintaining precise pressure, temperature, and moisture control. Once the perimeter seals are closed and cured, the unit becomes a closed system.
Because the spacer system and seals are not designed for re-entry, there is no reliable or permanent way to reinject argon gas without completely dismantling and rebuilding the unit. Any attempt to introduce gas after installation would be temporary at best and would not restore the original factory conditions or performance. Once the argon has escaped, the only effective long-term solution is replacement of the sealed unit.
Can’t I just drill a hole in the glass to release the moisture?
Absolutely not. This is an outdated misconception and an old field “trick” that does not address the actual problem. Drilling a hole may temporarily reduce the visible fogging by allowing moisture to escape or equalize, but it does not restore the integrity of the sealed unit. The argon gas is already gone, and the thermal insulation performance has already been compromised.
In fact, drilling the unit creates additional problems:
- It permanently breaks the seal system, allowing unrestricted airflow into the cavity
- It allows dust, dirt, and debris to enter the spacer space, which can permanently stain or damage the interior surfaces
- It can accelerate further condensation issues and visual distortion over time
- It leaves the unit structurally compromised and unrepairable
While it may improve appearance in the short term, it ultimately shortens the lifespan of the window and eliminates any remaining insulating value of the sealed system. For these reasons, proper remediation is replacement of the sealed unit rather than attempting to vent or modify it.
Am I covered under warranty for seal failures?
Sealed units glazed into a Century Glass Ltd. PVC frame:
Warranted for 15 years for seal failures, including cost of material and labor.
Sealed units put into an existing window, not manufactured by Century Glass Ltd.:
Warranted for 10 years for seal failures, not including cost of material and labor.
If you notice signs of a seal failure, it’s important to document and report it as soon as possible. Seal failures can appear and disappear depending on temperature, humidity, and sunlight conditions, so capturing evidence when it is visible is essential.
1. Take clear photos
Seal failure symptoms are often intermittent. Condensation, haze, or fogging may come and go, so photos taken at the time you notice the issue help confirm the problem and its severity.
2. Gather your installation information
Locate your original invoice or quote if available. If you cannot find it, we will need enough information to verify the installation record, such as the name on the account, installation address, phone number, and approximate year of installation
3. Submit a warranty claim
Once your information is ready, fill out the form below to submit a warranty claim. You can also visit our office or call us at (306) 728-2211 to submit or discuss details of a warranty claim.